
Got a tiny, sad backyard? Cool, same. The good news: you don’t need a giant budget or a landscaping crew to pull off a jaw-dropping glow-up. Think clever layout, thrifted finds, and easy DIYs that add major vibe. Ready for seven ideas that deliver big “after” energy without the scary price tag?
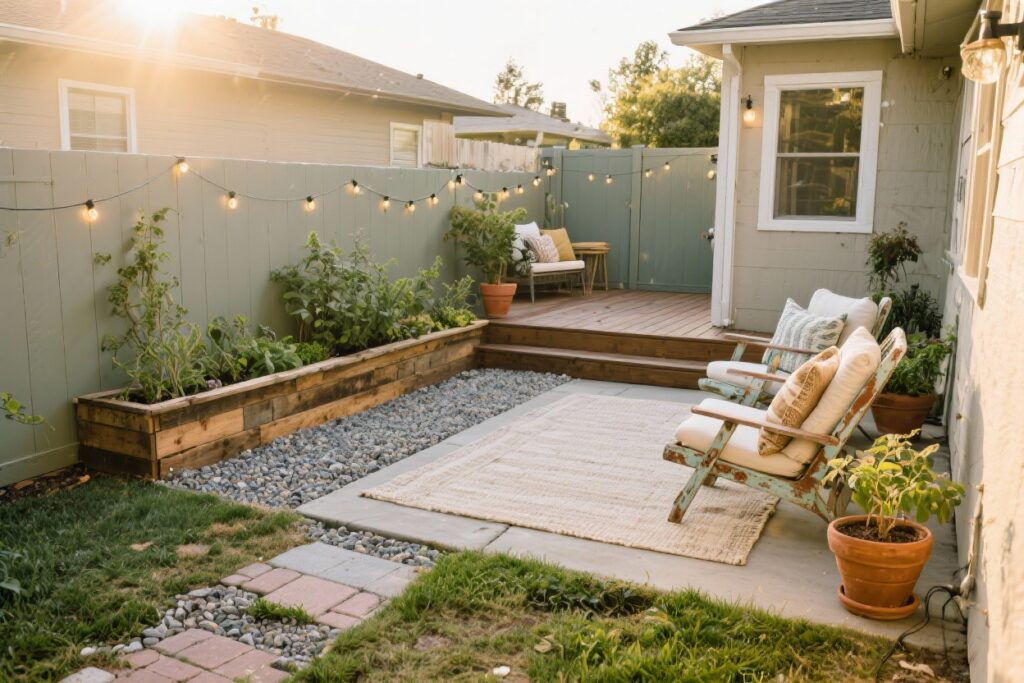
1. Define Zones Like A Designer (Even In A Shoebox)
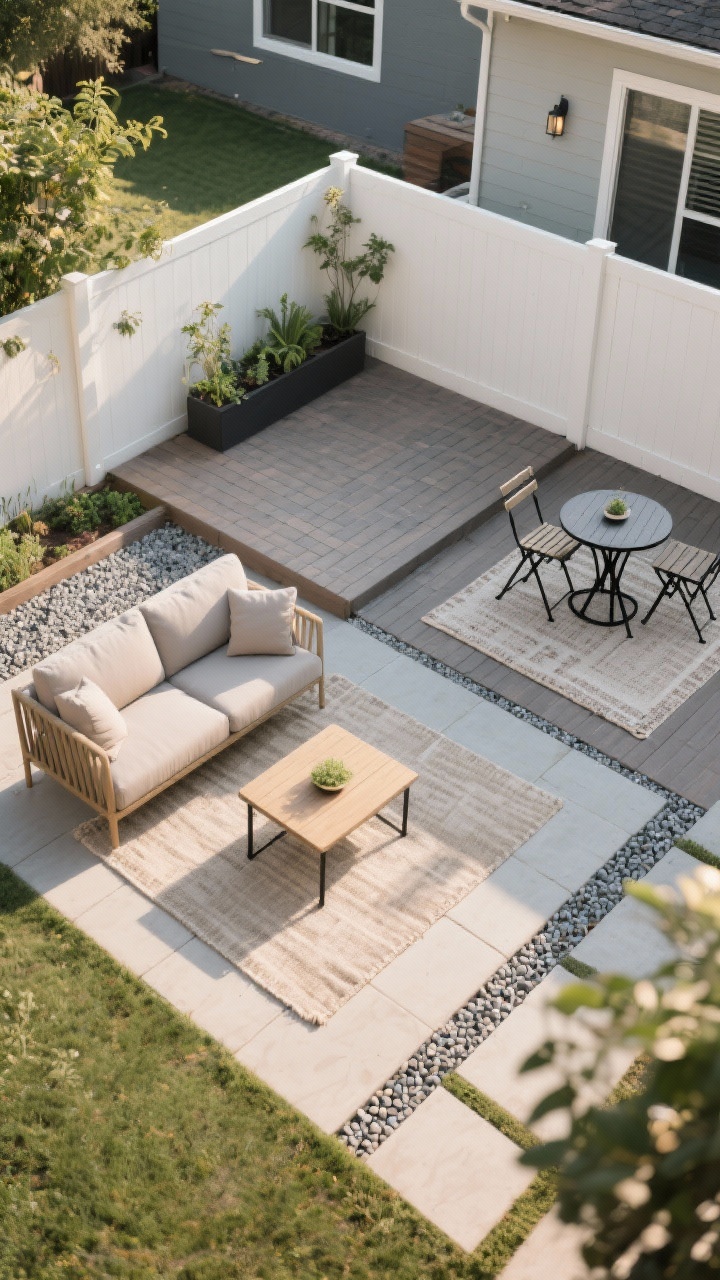
Before: one blank, awkward rectangle. After: a cozy lounge, a mini dining nook, and maybe a corner for herbs. Zoning is the secret sauce—your space instantly feels bigger and more intentional when you give each area a job.
How To Fake Square Footage With Layout
- Use outdoor rugs to anchor zones. One under chairs for lounging; another under a bistro table for dining.
- Float furniture off the edges. Pushing everything to the fence makes it feel like a waiting room, not a retreat.
- Switch surfaces for subtle separation: pea gravel for the dining corner, pavers or a deck tile area for lounging.
FYI: Even a 6×8 patio can look styled if you give it a floor plan and stick to it.
2. Ground It With Affordable “Flooring” (No Jackhammer Required)
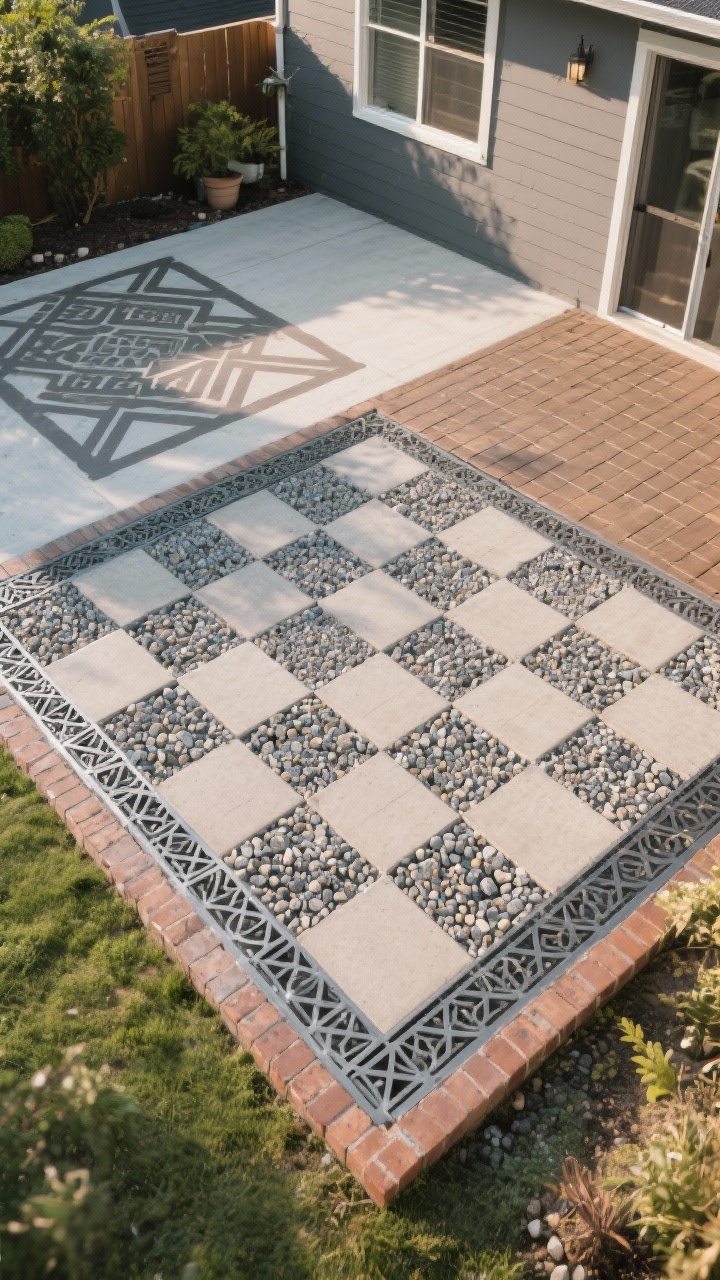
Before: patchy grass and muddy shoes. After: a clean, durable base that sets the tone for everything else. You don’t need concrete—just smart, budget-friendly layers.
Easy, Cheap Surface Upgrades
- Pea gravel + paver pads: Landscape fabric first, then gravel. Drop in budget pavers to create “stepping stone” paths or a checkerboard look.
- Interlocking deck tiles: Snap together over level ground or concrete. Looks luxe, installs in an afternoon.
- Stenciled concrete: Clean, prime, stencil with exterior paint, seal. Instant boutique patio vibes for pennies.
Pro tip: A tidy border of edging (rubber, brick, or metal) makes even the cheapest surface look intentional.
3. Go Vertical: Walls That Work Overtime
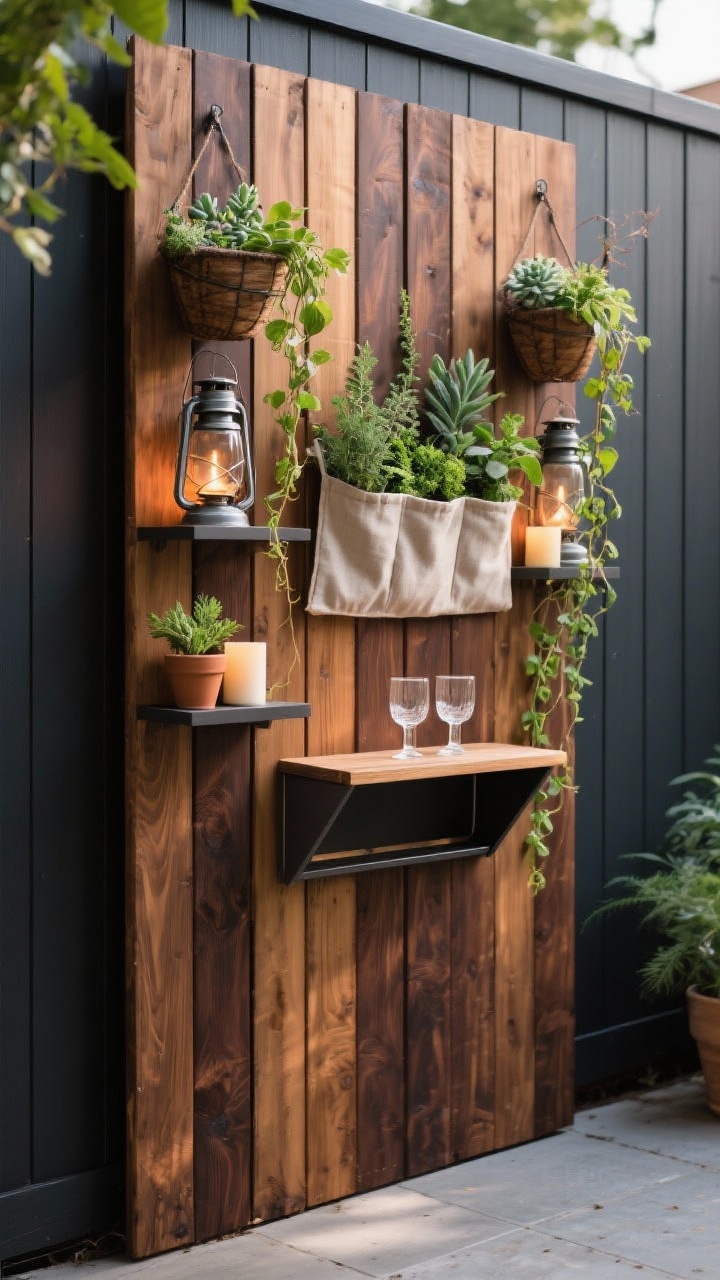
When you can’t spread out, go up. Vertical elements add privacy, texture, and storage without stealing floor space.
Simple Upgrades With Big Payoff
- DIY slat wall: Attach 1×2 or 1×3 boards to an existing fence. Stain them rich walnut or black for contrast—instant modern backdrop.
- Hanging planters & pocket gardens: Grow herbs, succulents, or trailing vines on the fence. Greenery = softens everything.
- Slim shelves: Weatherproof shelves for candles, lanterns, and small pots. Your decor gets a home and your ground stays clear.
Bonus move: Add a fold-down bar shelf for small-space entertaining. It flips up when you’re done—like magic, but with hinges.
4. Layer Lighting For That “Wow, We Live Here” Glow
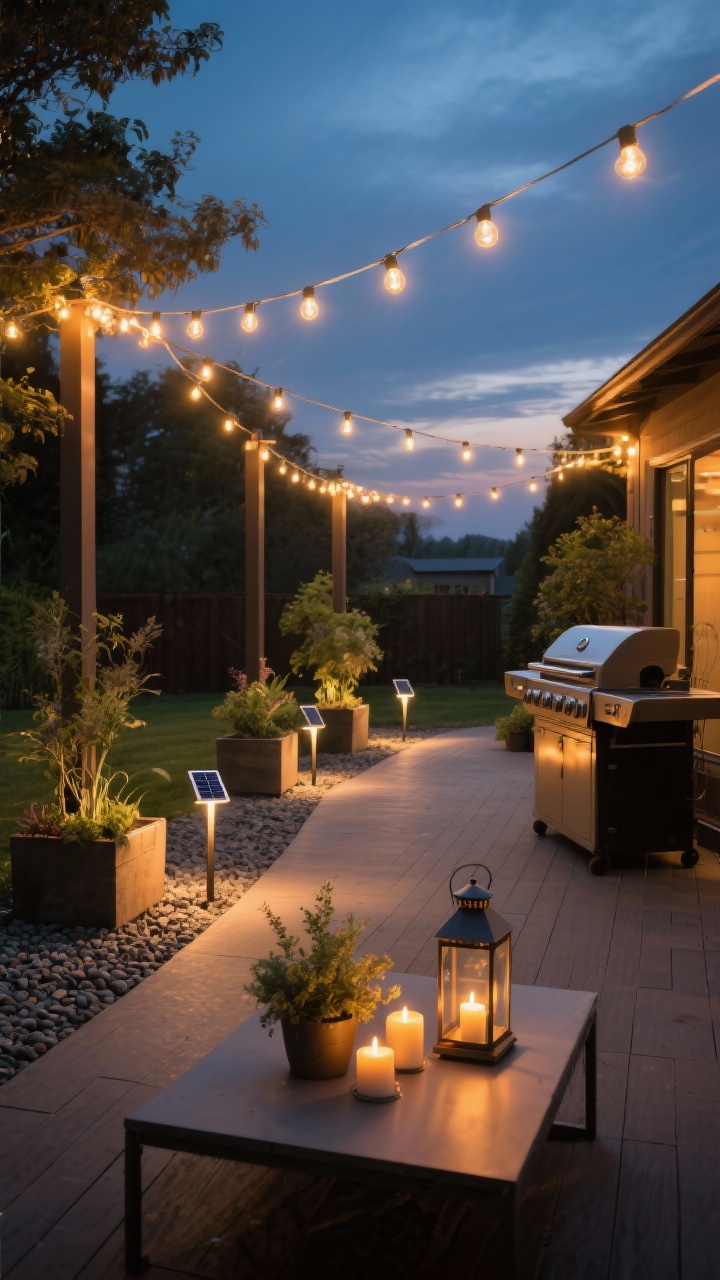
Lighting turns “meh” into moody and magical. It’s the quickest before-and-after you’ll see the second the sun sets.
Three Layers, Zero Fuss
- Overhead glow: String lights zigzagged across the space. Use posts in planters if you don’t have anchor points.
- Task lighting: Solar stake lights along paths or near the grill. No wiring, no stress.
- Accent lighting: Lanterns, LED candles, or a couple of solar up-lights pointed at plants for drama.
Keep bulbs warm (2700K-3000K). Blue-white lighting screams parking lot. Cozy is the assignment.
5. Furnish Smart: Compact, Comfy, And Cheap(ish)

Before: mismatched chairs that wobble. After: a tight edit of pieces that fit, function, and look pulled together. Comfort matters—if it’s not comfy, no one will sit there, including you.
What To Buy (Or DIY)
- Modular seating: A small outdoor loveseat + a stool/coffee table combo. Or DIY a cinder block and 2×4 bench with outdoor cushions.
- Bistro set: Two folding chairs and a tiny table—ideal for balconies or slivers of patio.
- Dual-purpose pieces: Storage bench for cushions, side table that doubles as a cooler, poufs that moonlight as extra seating.
Color story time: pick one neutral base (charcoal, tan, black) and two accent colors from nature (terracotta, olive, ocean blue). Your backyard will suddenly look “curated.”
6. Plants That Thrive On Neglect (But Look Lush)
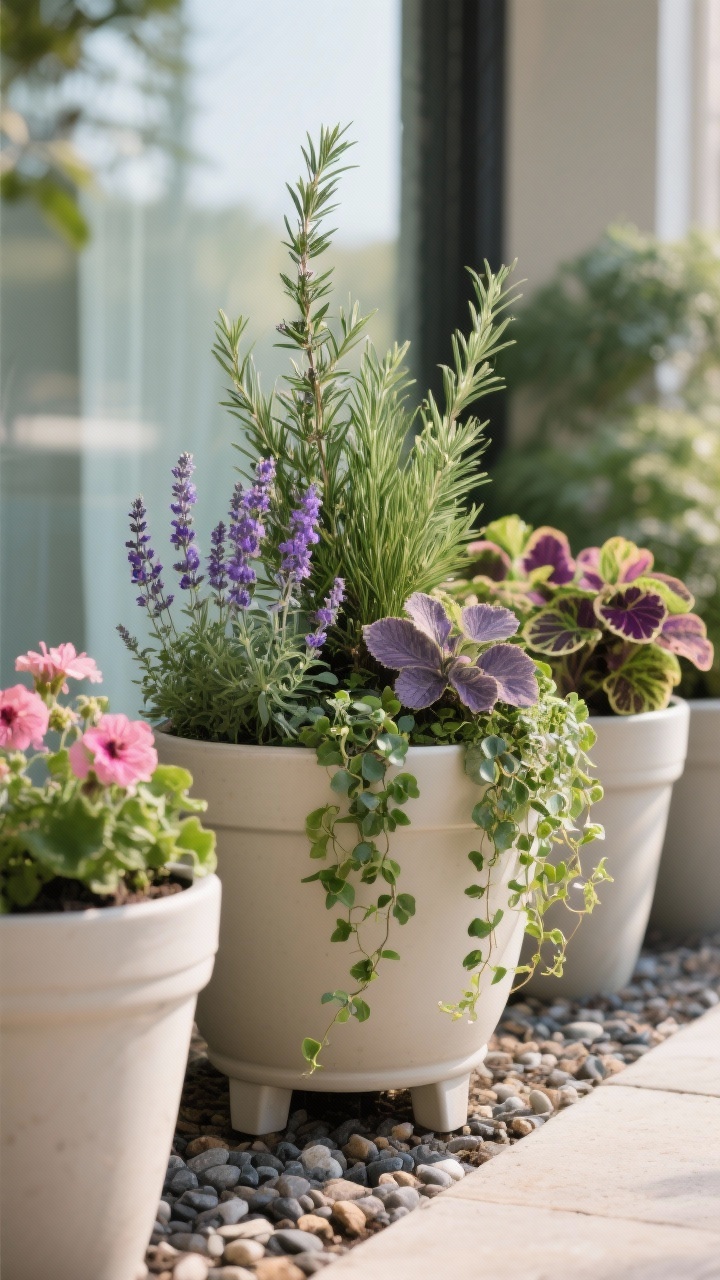
Plants add life fast. But if high-maintenance greenery stresses you out, stick to hardy, low-fuss winners that still bring texture and color.
Container Garden Formula
- Thriller (tall focal): dwarf grasses, small palms, or upright rosemary.
- Filler (mid-height): geraniums, coleus, lavender, or heuchera.
- Spiller (trailing): ivy, sweet potato vine, creeping jenny.
Use 3-5 big planters instead of ten tiny ones—cleaner look, less watering chaos. Bonus: choose lightweight resin pots and elevate with pot feet for drainage.
Budget-Friendly Greenery Tips
- Divide perennials from friends/neighbors. Free plants are the best plants.
- Stick to natives—less water, fewer pests, and they just…live.
- Mulch with wood chips or pea gravel to make everything look finished and keep weeds down.
7. Style The “After” With Finishing Touches (The Cheap Chic Part)
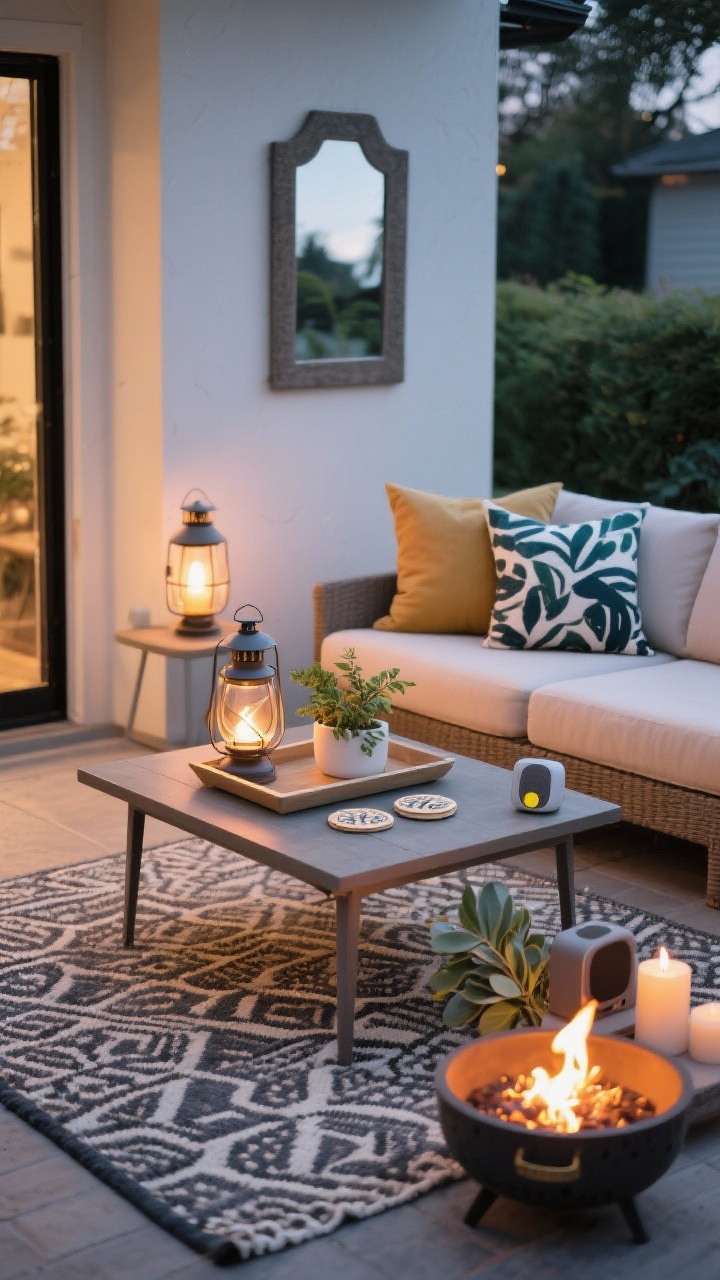
This is where the personality kicks in. A few thoughtful decor moments make your space feel intentional—not like you panic-bought patio furniture on sale (even if you did).
Easy Styling Wins
- Textiles: Outdoor pillows and a patterned rug = instant polish. Mix one bold print with two solids.
- Art outside: Weatherproof prints, a mirror in a shaded spot, or a DIY painted mural panel.
- Fire feature: A tabletop fire bowl or small propane fire pit for cozy evenings. Check local rules, obviously.
- Sound + scent: Small Bluetooth speaker and citronella or eucalyptus candles. Your backyard, but make it sensory.
IMO, a simple tray with a plant, lantern, and coasters on the table makes your whole space look styled—like a magazine, but you can actually sit on it.
Quick Before & After Checklist
- Declutter and power-wash.
- Lay a budget “floor” (gravel, tiles, or stencil).
- Define two zones with rugs and furniture.
- Add a vertical moment (slat wall, planters).
- Layer string lights, stakes, and lanterns.
- Plant 3-5 hero containers.
- Style with pillows, a tray, and one statement piece.
You don’t need a big yard or a big budget—just a plan and a free weekend. Start with the surface, carve out your zones, and build up the layers. By next Friday night, you’ll be outside admiring your own “after,” drink in hand, wondering why you didn’t do this sooner. Go make it gorgeous.